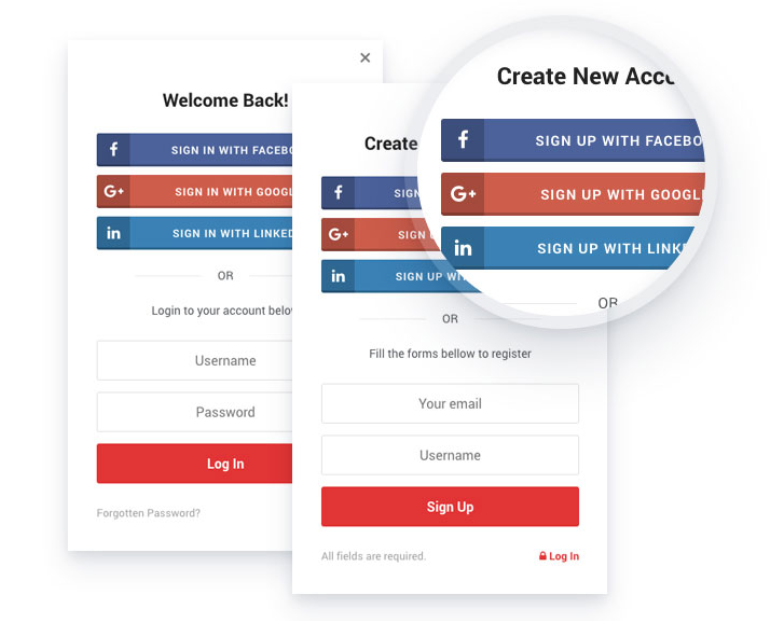
you want to simplify your website's Login and Register process on a Wordpress website or Source Script ? Adding a "Sign in with Google" button is the answer. It streamlines user registration, increases conversions, and improves overall user experience. This guide shows you how, whether you're using WordPress or another platform. We'll cover everything from choosing the right method to troubleshooting common issues.
Why Use "Sign in with Google" ?
Today's users prefer more speed and convenience. They're tired of creating yet another account and remembering more passwords. Offering "Sign in with Google" (or Facebook, etc.) solves this problem.
It lets users access your site using their existing Google account – a quick, secure, and familiar process. This boosts conversion rates, as fewer steps mean more people completing the signup. Plus, Google authentication provides a robust security layer, protecting your users' data. Using Miosit, you can then easily share your login page with a concise and memorable shortened URL.
How to Implementing "Sign in with Google" on WordPress

WordPress users have several plugin options. Many plugins offer easy integration, requiring minimal coding. Some popular choices include:
• WP Google Login a straightforward plugin, perfect for beginners.
• OneAll a social login plugin supporting Google, Facebook, and many more.
• Social Login Another robust option, offering customization features.
any type of creating login Process whatever WordPress or non-wp require you to create a Google Cloud Platform (GCP) project and obtain client IDs and secrets. The plugin's documentation will walk you through this process, which might involve creating a new project, enabling the Google People API, and generating OAuth 2.0 client credentials.
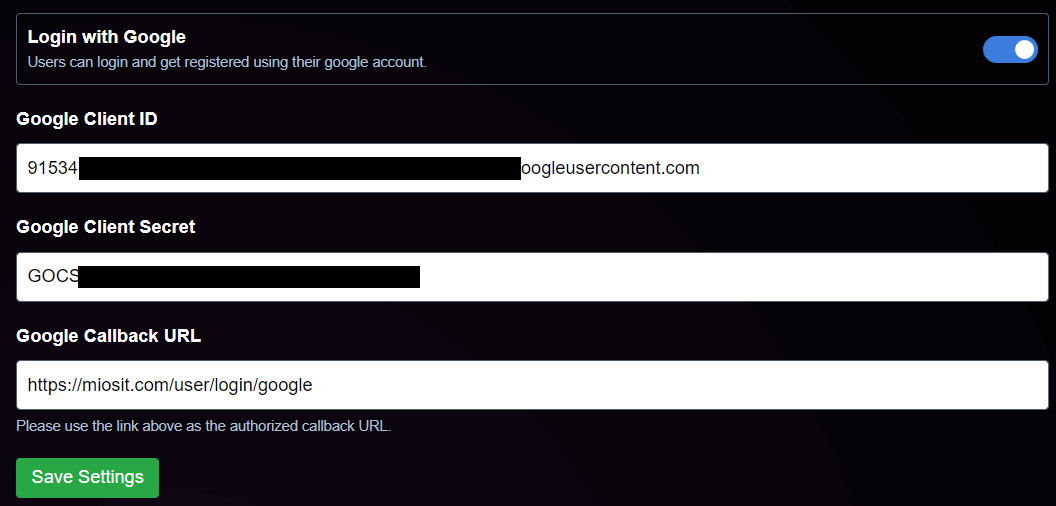
Once done, simply paste these credentials into your chosen WordPress plugin. Then, activate the plugin, and your "Sign in with Google" button will appear on your login page. Remember to test thoroughly after setup.
Setting Up Google Login Credentials for Your Web Application (WordPress or Non-WordPress)
1- Create a Google Cloud Project (or Use an Existing One)
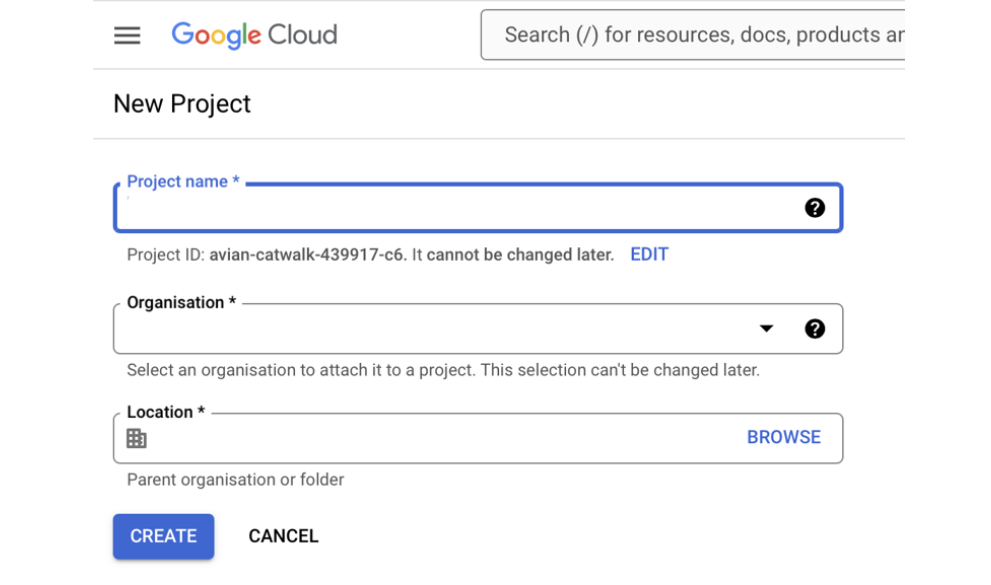
Head to the Google Cloud Console (console.cloud.google.com). If you don't already have a project, click the "+ New Project" button. Give your project a descriptive name (e.g., "MyWebAppLogin"). The default settings for organization and location are usually fine for most users.
2- Configure the OAuth Consent Screen
1- Within your Google Cloud project, navigate to "APIs & Services > OAuth consent screen"
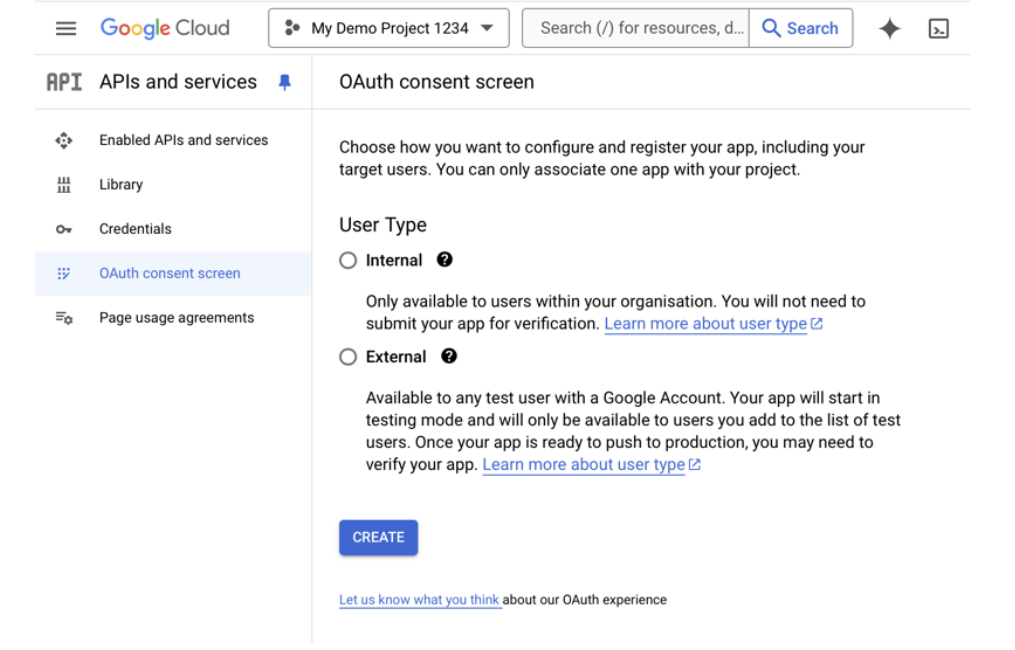
2- Choose the appropriate screen type ("External" for publicly accessible apps, "Internal" for apps used within your organization).
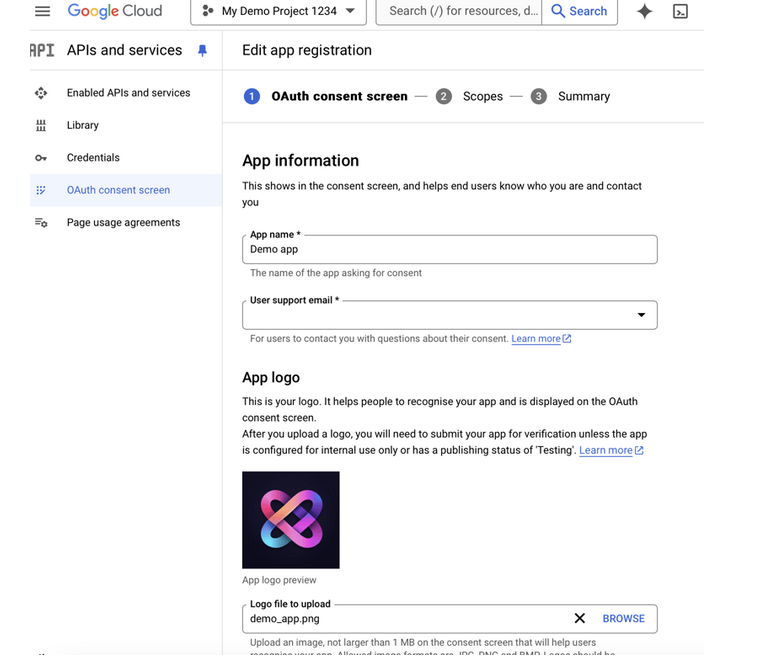
3- Fill in the required details: application name, support email, developer contact information.
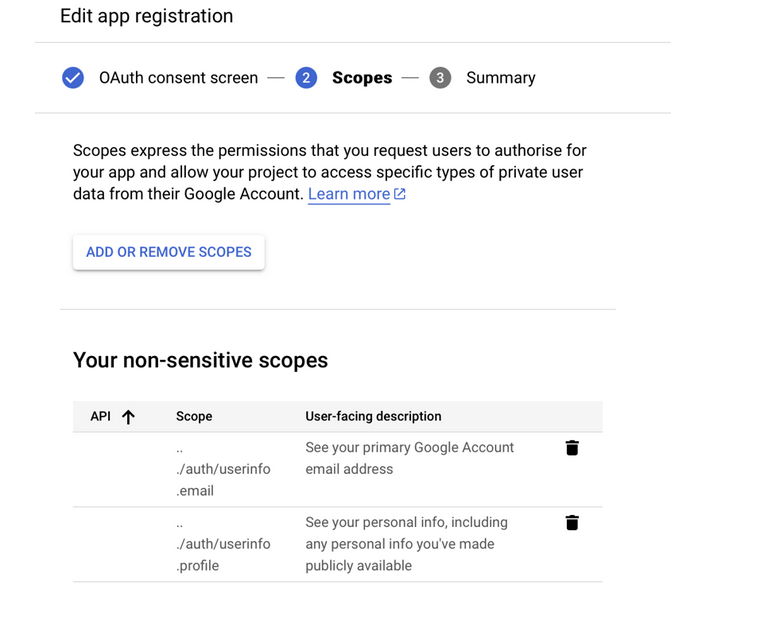
4- Select the necessary API scopes. For basic user authentication, you'll need at least "email" and "profile" Carefully review and select only the scopes your application truly needs. Avoid granting unnecessary permissions.
5- Review and save your OAuth consent screen configuration.
3- Generate Your Credentials
1- Go to "APIs & Services > Credentials"
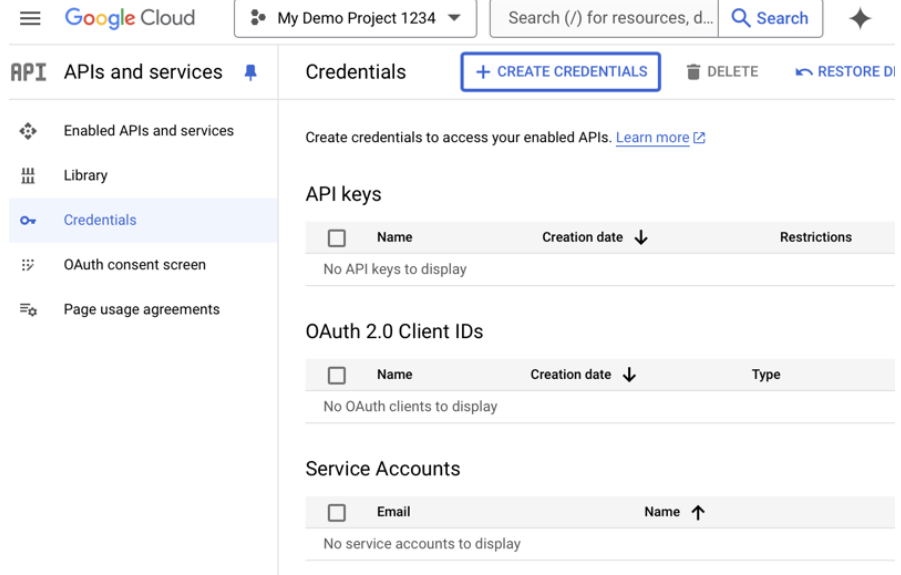
2- Click "+ Create Credentials > OAuth client ID"
3- Select "Web application" as the application type.
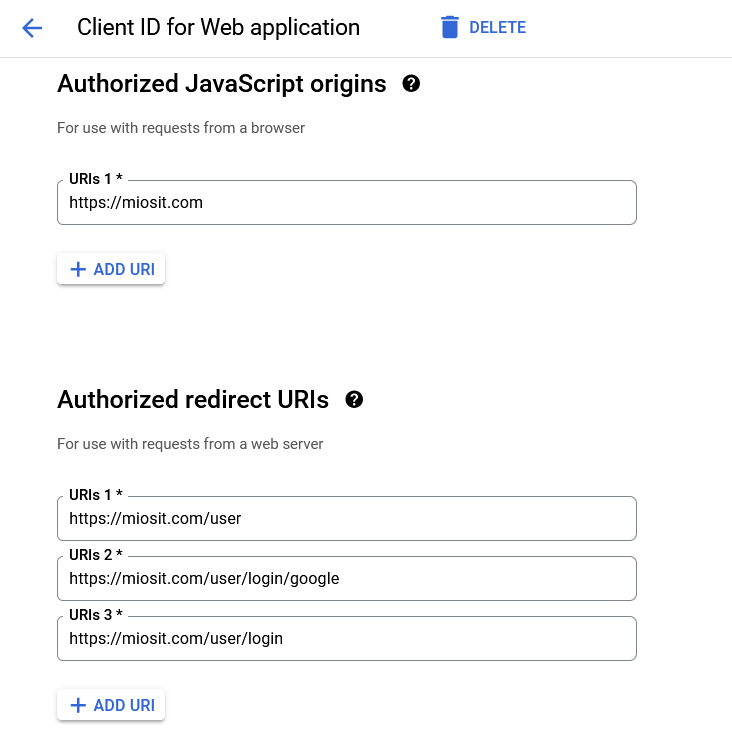
4- Enter the authorized redirect URIs and authorized JavaScript origins. These are crucial. The redirect URI specifies where Google will send the user after successful authentication (typically a page on your website that handles the login process) The JavaScript origin is the domain of your application where the Google Sign-In button will be implemented. Always use HTTPS for production environments. For testing purposes, http://localhost:3000 (or your equivalent local development server address) often works.
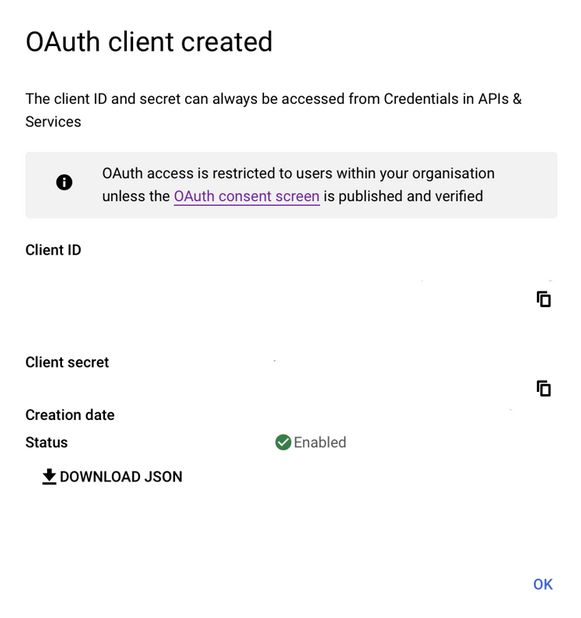
5- Download the JSON configuration file that contains your client ID and client secret. Keep this file secure! It should not be publicly accessible.
4. Integrating with Your Application
Now that you have your credentials, integrate them into your web application's code or WordPress plugin. This involves using the Google Sign-In library (or a similar library if you are using a backend framework). The specific implementation details will depend on the technologies you are using (e.g., JavaScript, PHP, Python). Refer to Google's official documentation for detailed instructions for your specific technology stack.
Implementing "Sign in with Google" on Non-WordPress Sites
nowadays most non-wordpress ready sources or base sources have this ability to add Google Login Credentials. But if its not This requires more technical knowledge and usually involves working with your website's backend code (e.g., PHP, Node.js, Python). Here's a simplified overview:
1. Create a Firebase Project: Firebase, Google's mobile and web application development platform, simplifies the process. Create a new project and configure it for authentication.
2. Enable Google Sign-In: Within your Firebase project, enable Google Sign-In as an authentication method.
3. Generate Credentials: Get your Firebase configuration file (usually google-services.json for mobile, or similar for web).
4. Integrate the SDK: Include the Firebase JavaScript SDK in your website's code.
5. Implement the Sign-In Button: Use Firebase's authentication library to implement the sign-in functionality. This will involve adding code to your website that creates a button, handles the authentication process, and redirects users appropriately upon successful login.
6. Handle User Data: Once the user signs in, access the user's profile information securely and store it for your application's use. Always handle user data responsibly and in accordance with privacy regulations.
This process can be quite complex and you might need help from a developer. But the improved user experience and enhanced security are worth the effort. Again, use Miosit to create short, shareable links to any page involved in your login process, including any links you've shared with clients or developers.
Frequently Asked Questions (FAQs)
Q: Is "Sign in with Google" secure?
A: Yes, Google's authentication system is highly secure and protects user data with robust security measures.
Q: What if I want to add other social login options?
A: Many plugins and platforms support multiple providers, including Facebook, Twitter, and others.
Q: Can I customize the appearance of the "Sign in with Google" button?
A: Yes, most plugins offer customization options to match your website's design.
Q: What happens if a user doesn't have a Google account?
A: They'll need to create one to use this login method. Consider offering alternative login methods like email/password for this.
Q: How can I track sign-in attempts?
A: Many login plugins offer analytics features allowing you to track login attempts and any associated data. Using Miosit's tracking features, along with your login tracking, gives a much better understanding of the whole process.
Q: What if I get an authentication error?
A: Double-check your redirect URIs and ensure your credentials file is correctly configured in your application. The Google Cloud Console may provide helpful error messages.
Q: Can I use this with Facebook or other social logins?
A: Yes, many platforms offer integration with multiple providers.
Q: My application is not using a standard web server. What should I do?
A: You need to adapt the redirect URIs and setup to accommodate the specific configuration of your application.
Q: How do I handle user data securely after login?
A: Always handle user data responsibly and in compliance with relevant privacy regulations (like GDPR and CCPA). Avoid storing sensitive information unnecessarily.
Q: What is the difference between a Client ID and a Client Secret?
A: The Client ID identifies your application to Google, while the Client Secret is a secret key used to authorize requests. Keep the Client Secret secure and never expose it in client-side code.
